Thing 11: Managing and manipulating digital images
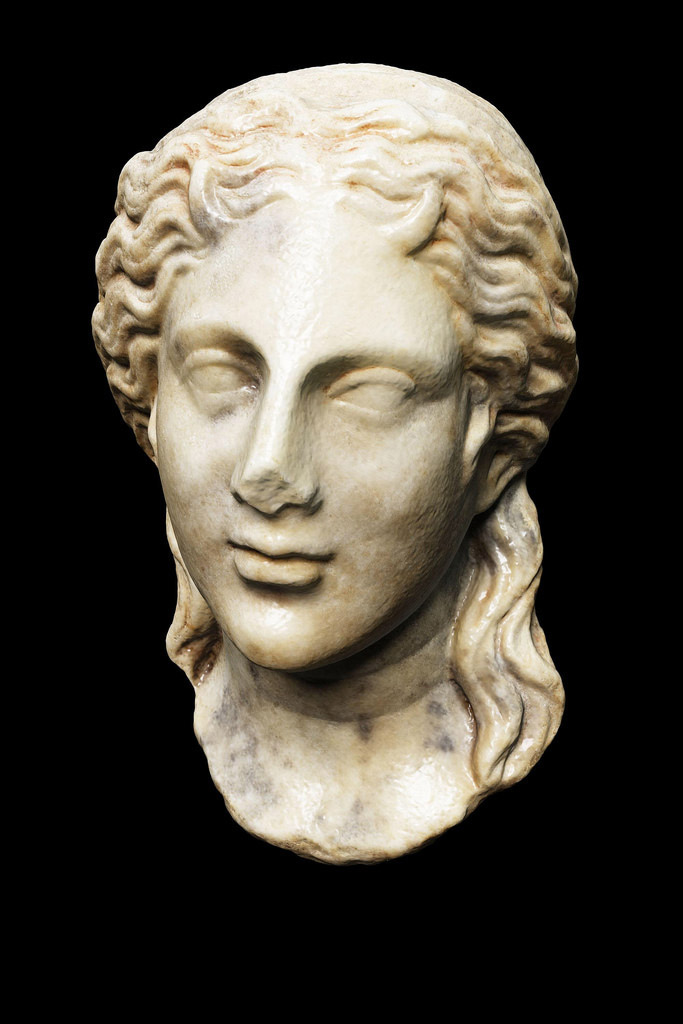
1st century BC statuette of Arsinoe IV.
Following directly on from Thing 10 on finding online images, this week’s post looks in detail at managing and manipulating digital images. Thing 11 has been written by Ben Kreunen from the University Digitisation Centre (UDC). The image to the left was created by the UDC using 70 photographs of the original statuette. For more information on the process, see the video here.
Images as raw data
As well as acting as visual records, images can also be used to create a range of additional forms of data. Advances in computer and camera technology have made many image processing methods more practical and also more economical. Here is an introduction to a variety of image processing techniques that can be used in many different research areas.
Image stitching
The software to stitch images together has been around for over a decade. These images are typically created to either increase the field of view of the image, up to a complete 360×180° view or to greatly increase the resolution of the image, showing extremely fine detail.
3D reconstruction from image slices
There are a wide range of medical imaging devices that can view the internal structures of human bodies and other objects. While the methods of acquiring the images vary, the methods of viewing a 3D representation of the images is the same. A range of software applications are available for processing these images sets for both viewing and creating models for 3D printing.
Photogrammetry
Photogrammetry can now provide high-resolution imagery using relatively cheap cameras and drones that previously required expensive aerial photography or satellite imagery. With a relatively low cost for equipment and software, photogrammetry is increasingly being used for recording significant sites and object. Online services such as Autodesk’s 123D Catch have brought this capability to anyone with a camera but higher quality results can be achieved by running software on your own computer systems.
Reflectance Transformation Imaging (RTI)
RTI is an imaging method that provides a means of inspecting the shape of the surface of an object.
Examples to explore:
- Video: 3D Model of Melbourne
- Yosemite Extreme Panoramic Imaging Project (Image stitching + 3D reconstruction)
- Inside Explorer (Combination of methods)
- RTI demos from the Smithsonian Institute
- Georgia O’Keeffe Museum Imaging Project (Photogrammetry and RTI)
Tools to try:
- Photogrammetry
- 123D Catch
- Photosynth
- Stereo scan (free) or Photoscan (functional demo, education price available)
- Medical Imaging
- Reflectance Transformation Imaging
Image manipulation
There are many tutorials on how to manipulate images both online and in the help files supplied with most image-editing applications. For this post I’d like to explore some of the more commonly misunderstood and/or misused image manipulations.
Sharpening
Many people think that sharpening an image increases the resolution. Most sharpening filters only change the contrast at the boundary of two areas of different intensity (what we see as an edge). This gives the perception of the edge being “sharper” but this does not increase the resolution of the image. Instead it Increases the amount of sharpening a filter performs. Over-sharpening can reduce the image quality by changing the contrast of other parts of the image that are not at the “edge”.
Resizing images
Inserting large images into presentations and documents will not only increase the size of the document unnecessarily, but it may even cause the program to slow down considerably and, in extreme cases, prevent you from saving the document. Images should ideally be resized to fit the intended purpose.
Resizing all of the images within a directory can be done in a number of different ways but the simplest will allow you to specify a specific size to fit the images into rather than specifying the exact size of the images (which may be different). For Photoshop the Image Processor provides a quick method of doing this. Don’t have Photoshop? Mac users can do this with Preview and the freeware application Irfanview is handy for this on Windows.
The following table lists some suggested maximum image sizes. The numbers for publication figures are based on typical journal requirements.
| Usage | Image size (pixels) | Resolution (optional) |
| PowerPoint slide | 1000 x 800 | 100dpi |
| Portrait A4 page, Word* | 1000 x 1500 | 150dpi |
| Single column publication (image only) | 1000 (width) | 300dpi |
| Single column publication (image and text labels) | 2000 (width) | 600dpi |
| Double column publication (image only) | 2000 (width) | 300dpi |
| Double column publication (image and text labels) | 4000 (width) | 600dpi |
* For general documents in Word, 150dpi is adequate for most uses, which is half of the requirements for image-only publication figures.
Colour ‘correction’
If accurate colour is critical to your images, then you will need to calibrate your image capture processes to achieve this. Correcting colour manually is fraught with danger because one of the most powerful image processors is not connected to the computer. The human brain can process images very rapidly and the interpretation of colour is based in part on context of the image. These optical illusions demonstrate how easily our brain is fooled.
As if that’s not enough, our built-in image processors are all different, and slightly flawed to varying degrees. Try taking this simple test to see how well you can pick differences between colours. So while it may be okay to adjust the appearance of an image to make it look “nice”, if the accuracy of the colour is important then it’s not so much a question of “how do I adjust the colour?” but “should I adjust the colour?”
Nearly all image editing applications have some form of automatic colour correction and most of these make use of two things:
- the assumption that every image has a small percentage of both black and white in the image.
- the principle that colour correction is the process of changing the numerical values of a colour to the known values for that particular colour.
This works pretty well for improving the appearance of most images but in some cases the first point may not apply to an image, causing the correction to make the image look worse. This Photoshop tutorial outlines a manual process that provides more control using the same two principles. Equivalent steps can be found in most other image editors.
More information:
- Digital Imaging Tutorial (no longer updated, but still a good introduction)
- Cambridge in colour: Photo editing tutorials.
Colour calibration
The best way to get accurate colour images is, obviously, to get it right the first time. There are a range of calibration targets and software that make it possible to get accurate colour from scanners and cameras without requiring manual correction later. If you need assistance with calibrating your scanner, the University Digitisation Centre can provide assistance.
More information:
- Silverfast tutorial for scanners.
- ACR Calibrator L (Photoshop script for calibrating scanners with a Macbeth colour chart).
- XRite ColorChecker Passport (Portable colour target and software for calibrating DSLR images).
Metadata
Embedding metadata into images is one of the most important “manipulations” as it provides invaluable context for the image. On the surface, though you could be forgiven for thinking that it’s really difficult:
- There are two ways in which metadata can be embedded into an image: Information Interchange Model (IIM) and Extensible Metadata Platform (XMP). It is possible for an image to have both at the same time, with different information in each. For simplicity we’ll ignore IIM for now but be aware that it exists.
- There are several different namespaces that can be included within XMP metadata. Their usage and interpretation is inconsistent between applications, e.g. Dublin Core (DC simple), International Press Telecommunications Council (IPTC), Publishing Requirements for Industry Standard Metadata (PRISM), Creative Commons (CC) to name but a few
- Camera and scanner manufacturers enter product information into images in many different ways, occasionally misusing fields such as creator and description.
- Large companies dealing with images occasionally go off and create a metadata schema for their own purposes
There have been a number of initiatives to try and promote the use and consistency of embedded metadata such as IPTC’s Embedded Metadata Manifesto and the industry led Metadata Working Group but a number of challenges remain for it to be a common practise. Possibly the greatest challenges stem from the fact that there are very few software tools for embedding and updating metadata, especially when it comes to handling large numbers of images. While embedding metadata is a technically straightforward process, tools to allow for updating several metadata fields in several images efficiently have not really been produced for mainstream use.
The inclusion of metadata in images allows it to be reused in other application. Many web hosting systems will automatically populate fields from the metadata in an image, making it simpler to upload and share large numbers of images without having to do additional data entry. One important thing to be aware of when using third-party image sharing sites, is that while they may add your metadata to the page displaying the image, it may not be present in the images people download.
Returning to the “images as data theme”, the use of metadata in scientific imaging systems is used to provide information about the various settings of the equipment used and the conditions under which the image was produced. In this case there are a large number of tools for specific applications to deal with the variety of data specific to each discipline. Packaging the data within the file makes it easier to share the images whilst still providing the information required to interpret the image and make valid comparisons with images from other sources.
In many cases a lot of scientific “image formats” consist of a standard file format such as TIFF with a custom metadata schema added. The Open Microscopy Environment (OME) TIFF specification, for example, is essentially an ordinary TIFF file with XML metadata added into the standard description field.
Metadata is critical for finding images easily, but in order to save time you have to spend the time creating good quality metadata. Doing this efficiently is certainly challenging but is well worth the effort of learning create it.
Things to explore:
- Use cases for metadata.
- Rummage through the EXIFTool tag names documentation to see what sort of information can be embedded into an image, particularly DC, IPTC, CC, MWG, MWG Keywords (hierarchical), PRISM, GPS.
- Image Snippets, an online metadata authoring system using linked data as metadata.
- Consider using a controlled vocabulary tool to assist with tagging images.
Tools to try
- Look at the file properties in your favourite image editor/viewer and see what fields are available (and which ones have been filled in).
- EXIFTool, a powerful command line application for reading and writing metadata of many formats including MS Office documents (read only).
- Jeffrey’s EXIF viewer, a browser-based metadata viewer for online images; e.g., this thumbnail image from Getty Images (Nature Stock Photos).
- Microsoft’s Pro Photo Editor Tools provides batch editing of metadata for the more common fields.
- IPTC Core and IPTC Extension file-info panels for Adobe CS5 to CS6.
Managing images
I suspect that some readers will be looking to this section for some quick answers to software that they can obtain to manage their images. Unfortunately it is not that simple.
Managing digital images is really a subset of digital asset management (DAM) which also includes other forms of documents and digital research data and in this respect should not be considered in isolation from the other types of files. Digital asset management is “the process of managing digital assets” and in view of this, software applications are merely the tools that facilitate that process.
The challenges to managing images are very similar to managing other research data. Metadata provides the context for finding, interpreting, sharing and reusing images but is often seen as an additional task for which there is not enough time available. In order to have enough metadata to effectively manage images, the creation of metadata needs to be integrated into the processes for creating the images and at every stage of their use. Dumping images into a “catalogue” at the end of a project will not automatically make them easy to find.
At the extreme end of things, the Open Archival information System (OAIS) describes a reference model for the long term management of data. Some key aspects of this are that it describes the management of various forms of metadata throughout the process and that there are metadata requirements that must be met at an early stage before anything can proceed.
While this level of organisation may be a worthy goal, for most of us it is not practical to get there in one step. There are often a number of requirements that must all be met in order for a digital asset management system to be effective such as:
- the development of image management processes from creation to archiving.
- engaging the appropriate experts to help develop image management processes from creation to archiving.
- the availability of technical expertise for processing the images.
- the purchase or development of a software system to support these processes.
- engaging the appropriate expertise to customise the software system to meet your specific processes.
- funding for all of the above.
Waiting for all of these things to occur at the right time can be like waiting for the planets to align. Many projects fail to get off the ground because one or more of these things aren’t available and others have failed because they proceeded anyway. Improving the management of images should be treated the same as improving the management of data. The challenges are very similar, after all, since images are data.
Things to explore:
- In the commercial world time is money. Streamlining the management of digital assets including images is a business improvement. Examine some of the challenges outlined in white papers from commercial digital asset management solutions such as:
- Extensis Portfolio
- Canto Cumulus
- Try a single user demo DAM package to see what features they provide. Cumulus single user
- Share your experiences and problems with others. Leave a comment with an example of your own challenges or successes.
Does file size matter?
If so, what sizes work best for each purpose?
Hi Susan, if I may venture to answer you question: file size is dependant on the image dimensions (width and height) as well as the resolution of the image. Therefore if you stay within the boundaries of the recommended dimensions and resolution it should’t be too much of an issue. Of course there will be some fluctuation dependant on the format you save your image (JPEG, PNG, TIFF…) with PNG and TIFF they are what are known as ‘lossless’ formats so will always be larger than a JPEG which is a ‘lossy’ format that loses some image fidelity for a smaller file size. Depending on the software you use you will usually have a slider when saving an image as a JPEG which allows you to pick how much fidelity you want to lose for a smaller file size- if not for print you can usually lose a little quality to shave off a significant amount of file size while still having no real impact on image clarity.
Hope that helps!
It depends…
File size doesn’t matter… In order to display an image, a program has to uncompress it to read all of the information, so the amount of resources the program will need to do this will be pretty much the same regardless of whether it is JPEG or TIFF.
File size might matter… If you include a lot of images in a document, the file size of the document may increase to a size where your computer has difficulty opening or saving it. Other uses may have size restrictions such as emailing attachments.
File size shouldn’t matter… The amount of detail in an image is primarily determined by the number of pixels, which is why the table of recommended sizes in this post uses these for image dimensions. The main thing to consider then is how much detail does each intended purpose require as a minimum. If your images are smaller than this then they may not be suitable, and if they are considerably larger they will require more resources to work with for no real gain.
I’m working to help catalogue a small collection at the University of Melbourne. A single user DAM package like Canto (I’ve tried the demo) would be great to help organise everything but is a little expensive.
Is there a way of acquiring this software under a cheaper educational student/staff license? Or is there a free DAM alternative that you can recommend.
Cheers.
Hi John
Sorry for the late reply. Must have missed the notification. “Expensiveness” is certainly a matter of perception, and unfortunately one that tends to be at the very low end in academic institutions. That said, DAM is more than just “creating a catalogue” so it partly depends on what else you need to do with the catalogue and how that fits in with the existing management processes for the collection. It’s very difficult to give a short answer for this as it depends on so many things. If you’re still looking for a solution, feel free to contact me at the University Digitisation Centre